Just as so-called “fish finders” (sonar units) revolutionized sport fishing for anglers many years ago, allowing them to see below the water’s surface, so too have trail cameras more recently allowed hunters to now see what’s going on in the woods 24/7. But if you are new to the world of trail cameras, the learning curve can be a bit steep and confusing. Below are some tips to help get you started. Our first tip is to take your time when choosing your first trail camera and enjoy the journey.
What trail camera should I buy?
As when buying any photography equipment, it’s always wise to purchase the best camera your budget allows. This will pay dividends not only in the quality of photos, but also in the longevity of the camera and its additional options for use.
A good way to begin your search for a trail camera is word of mouth; in other words, ask your hunting buddies. Two basic questions to begin with are: What brand of trail camera do you use, are you pleased with it and why? Depending upon the answers you receive, you might next ask about ease of use, battery life, warranty, etc., and, of course, price.
Going online should be your next step—just don’t be surprised if you’re overwhelmed with information, as there are many makes of trail cameras on the market, with new models being developed yearly as the technology advances. That’s why talking to other hunters first is a good idea, as it at least gives you a place to start when narrowing camera choices.
Most trail cameras have the ability to take still photos and short video clips. Some have the ability to do both simultaneously, taking a still photo first, followed by the video. Such a combination camera will likely be more expensive, so if you don’t necessarily need the capability to take both stills and video at the same time, that’s an opportunity to save a few bucks.
Another decision you’ll have to make is whether or not cellular capability is important to you. Some advanced trail cameras today can transmit photos from the field directly to your cellphone or other electronic devices. However, you’ll pay a premium for that service, so again, there’s a place to save some money.
But one item not to skimp on is the removeable memory card your camera requires. Most trail cameras operate on an SD card—short for Secure Digital card—and the specs for a particular camera will list the size of card needed for best results. Always buy quality memory cards!
It’s also a good idea to purchase a second, identical-size SD card when buying your trail camera. In that way, you can swap out memory cards when you go to check your camera in the field, and won’t have to make a second trip back to the camera to reload the card after viewing and deleting any unwanted photos on a computer.
Where should I set up my trail camera?
Most anywhere. Adjacent to wildlife trails or watering areas, overlooking feeding areas and food plots, along woods roads or field edges, near deer scrapes or elk wallows … the possibilities are endless. It all depends upon the species you’re hunting and the terrain in which that critter lives. If possible, choose a relatively flat area that’s clear of brush so the camera has an unobstructed view of any approaching animals. If you have to clear some brush, make sure that’s legal to do if you are on public land.
How should I set up my trail camera?
You’ve purchased your new trail camera, programmed it to your needs, and chosen a promising location in which to place it. Now, a couple of last details will help in obtaining those great still photos/video clips you’re anticipating.
If at all possible, aim the camera north. This is important for several reasons. Since the sun rises in the east and sets in the west, if you aim your camera in either of those two directions the movement of the sun throughout the day may inadvertently trigger the camera. What you’ll end up with are some pretty landscape shots, but not the animals you’re after. Likewise, do not aim the camera south. In North America, the sun is in the southern section of the sky, so if aimed that direction your photo subjects will be backlit on sunny days. Aiming your camera north avoids all these issues, giving you the best-exposed photos possible.
Also, when positioning a trail camera along a game trail, aim it either up or down the trail, not directly perpendicular to the trail. In other words, give the camera as much distance as possible to detect a moving animal and take the photo. If a camera is pointed directly at a trail, and is mounted only a short distance from it, an animal walking in front of the camera only has a narrow window in which to trigger the camera. So, if you are consistently getting photos of just heads or tails instead of the whole animal, try aiming your camera parallel to the trail. Keep in mind, too, that most trail cameras are designed to take photos at relatively close distances, usually just 20 to 40 feet away.
As for distance of the camera from the ground, suggestions vary. Some hunters prefer their camera mounted waist high, while others want it 5 or 6 feet high to capture more of a panoramic view. Proper height has a lot do with the species of game animal being sought and the terrain, so try various heights to see what works best for you in your area.
Trail camera security
There is nothing more maddening than going to retrieve your trail camera and finding it gone, stolen. Unfortunately, some people just can’t seem to keep their hands off of other hunters’ property. This seems to be a more common problem when hunting public lands. But you may have unwittingly played a role in having your own camera stolen by how/where you mounted your camera.
When most people walk through the woods, they are looking at eye level and below. Most of us do not glance up much unless something catches our attention, such as a sound like a bird call, perhaps. You can use this behavior to your advantage by mounting your trail camera higher than a human’s line of sight—someone can’t steal what they can’t see.
It also helps to mount the camera higher than a person can reach, say 8 or 9 feet off the ground. That way, even if someone does spot your camera they can’t easily reach it, and most people won’t take the time or make the effort to climb a tree.
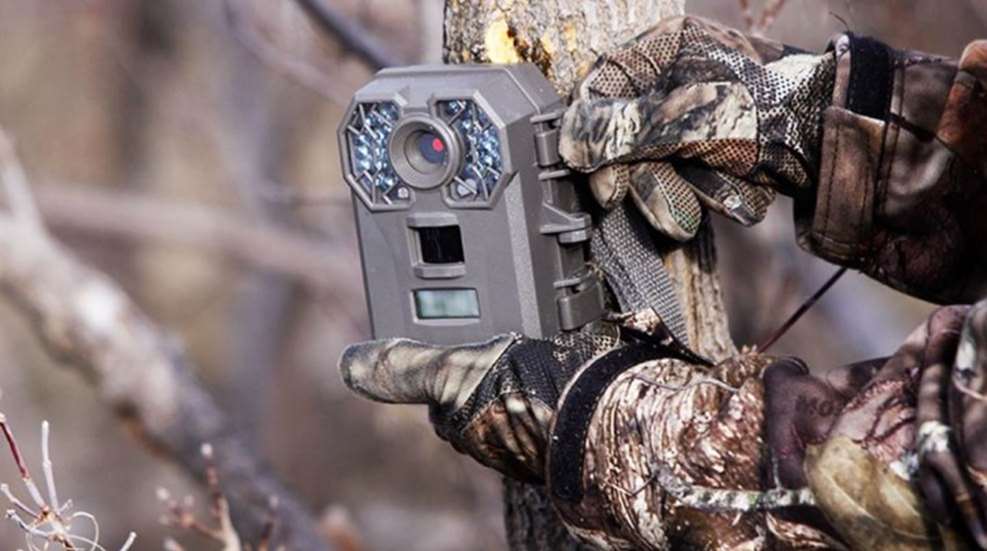
Camouflaging your camera will also help it blend into its surroundings. Leaves, bark and downed tree limbs can all be used to break up the camera’s outline. Just don’t overdo it and defeat the purpose.
Another tip is to replace the strap that came with your camera with a piece of dark-colored or camouflaged parachute cord. The cord is narrower than the original strap, hence it’s much less obvious. Most trail cameras are spotted by other hunters who first notice a wide strap around a tree, not the camera itself.
Lastly, a cable lock fastened to your camera and encircling the tree on which it’s mounted will assure that your investment will be waiting for you when you return.
Most Popular