The Kneeling Position has a lot to recommend it: It's quick to assume and get out of, gives you better observation of the field than the prone or sitting positions, and gives you better support than standing. Its downside is that staying in the position longer than a minute or two can become uncomfortable. However, you can overcome the discomfort, plus train yourself to shoot tight little groups from the kneeling position if you put the time and effort into it. In a kneeling match, competitive shooters have an hour to shoot 40 shots at dime-sized 10 rings from 50 meters, and the winner may shoot close to a perfect score of 400. For most of us, though, combining the kneeling position with external support (for instance a tree, fence post or crossed sticks), helps stabilize the position. Whether you use external support or not, understanding which of the three kneeling positions will best fit your flexibility and body shape is key to making the most of it. All three kneeling positions get their names from the position of the rear foot that supports the weight of your body. Starting with position that offers the least contact with the ground to the most contact with the ground, the positions are: rolled-toe, boot-lace-down and sitting-on-foot.
Rolled-toe has only the right toe, the right knee and left foot in contact with the ground. It's the highest position and requires the least amount of flexibility to assume. (On the topic of flexibility, some people are so muscular that they cannot get the base of the spine close to their heel, which eliminates bone-to-bone support and requires them to muscle the gun the entire time...reducing stability.)
The boot-lace-down position is so called because the boot lace of the right foot is in contact with the ground. This lowers the position, transferring more weight back onto the right foot, which in turn increases stability-but requires more flexibility. Competitive shooters improve the boot-lace-down position by adding a kneeling roll between their foot and the ground. Utilizing this kneeling roll puts the foot back into a natural position and raises the heel for a more comfortable position.
In the sitting-on-foot position, the ankle is turned and one sits on the side of one's boot. Sitting on the turned foot transfers most of the body's weight rearward onto the right foot, and requires a great amount of flexibility; much more than the other two positions.
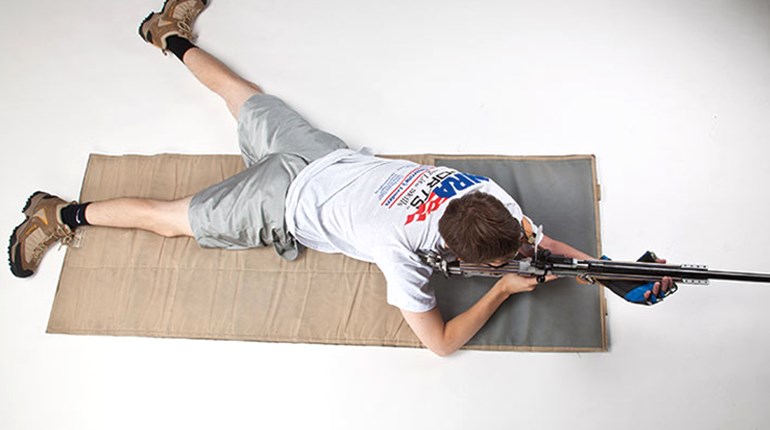
Today, let's look at the rolled-toe position using the eight-step teaching method: 1. Study the position, 2. Practice the position without the rifle, 3. Practice with the rifle, 4. Align the position with the target, 5. Dry-fire the rifle at the target, 6. Shoot groups at the target with live fire, 7. Adjust sights to center shot group on target, and 8. Continue to shoot groups from the position. We will cover steps 1 through 4 in this article.
Step 1. Studying right-handed shooter in the rolled-toe position using a hasty sling.
*The position is about 20 to 30 degrees off the firing line.
*The toe of the right foot is rolled up to raise the heel up to meet the base of the spine or hip. The preferred position is for the heel to be at the base of the spine for bone-to-bone support. The heel-to-muscle support will weaken quicker than bone-to-bone support.
*The left or forward foot is flat on the ground with the left leg below the knee straight up and down, or foot out in front just a little.
*The sling goes across the chest and behind the arm as high as possible to take advantage of the angle to increase support of the rifle.
*The left or forward elbow is forward of the kneecap, but may be behind the knee depending on the person's arm and torso length.
*The support hand is over the sling and under the forearm of the gun.
*The forward arm and hand are relaxed. The weight of the rifle is held up by the sling.
*The butt of the rifle is in the shoulder close to the neck.
*The shoulders are level.
*The right hand is firmly on the rifle's pistol grip to support the trigger finger and pulls the rifle firmly into the shoulder.
*The face is placed firmly against the stock with your dominant eye looking straight through the sights. The face must be in the exact same position on the stock to produce small shot groups.
*The head is level, which helps steady the position.
Now that we have completed the "Study the Position" step for the rolled-toe kneeling position, it is time to get into one of the three positions without the rifle.
Step 2. Practice the position without the rifle: Without the rifle you do not have to worry about the rifle's muzzle direction yet, which allows you to focus on developing the position. Assume the position with an imaginary rifle following the bullet points listed above until you feel you have the position down.
Step 3. Practice with the rifle: Now pick up the rifle and attach the sling, always watching where you point the muzzle of the rifle. Again, follow the bullet points listed in Step 1.
Step 4. Aligning the kneeling position to the target:
*For horizontal adjustments, the pivot point is the support foot. You move the whole body left or right to move the rifle on the target. If you are shooting off a support, move your whole body left or right, pivoting on the support to move the rifle to the center of the target.
*For vertical adjustments, tighten or loosen the sling to raise or lower the height to center the rifle on the target. If you're shooting over support, simply raise or lower the height of the support to center on the right side of the knee.
Now that we have covered the first four steps of learning the kneeling position, you may be wondering how to safely assume the kneeling position. The steps are as follows:
- Keeping your rifle pointed downrange, approach the firing line, then step back about the distance of half your height.
- Attach the sling to your arm, keeping the rifle pointed downrange.
- Keeping the rifle pointed down range in your left hand, kneel down on your right knee and position the heel of your right foot at the base of your spine.
- Keeping the rifle pointed downrange, push the rifle forward with your left hand and then guide the butt of the rifle into your shoulder close to your neck. The sling should be tight enough to act like a rubber band pulling the rifle into your shoulder.
- Extend your neck and lower your face onto the stock. You should see the natural alignment with rear and front sight.
Practice keeping the rifle pointed in a safe direction when getting in and out of the position until you are comfortable with it. Keeping the muzzle always pointed in a safe direction is the first rule of safe gun handling and range etiquette.
This is a quick introduction to the kneeling positions, which you will see used for hunting, or competitive shooting with the addition of a sling. For more details on these positions you may want to contact an NRA Rifle Coach. To find a coach near you, contact the NRA Coach Program at [email protected] or attend an NRA rifle competition.