Like any skill, shooting accurately takes practice to become perfect, but spending time shooting from a bench at the range won’t necessarily make you a better shot in the field. Out there, at the moment of truth, you have to overcome a racing heartbeat, heavy breathing and trembling hands to make the perfect shot. And you usually have to do so without the benefit of a bench, meaning the only shooting platform around is you.
When positioned correctly, your body can serve as a stable rest to get off a safe, steady and accurate shot, even when you’re in the grips of buck fever. The key is knowing which of the four standard shooting positions to use, and when and how to quickly and safely get into position for the shot. Like bench shooting, practice makes perfect—so the next time you’re at the range, ask your parents or other adult if you can try shooting from each of these four positions to find out which one works best for you.
Prone
Under ideal conditions, lying on your stomach in what’s known as the prone position is the steadiest and most comfortable of the four shooting styles. Unfortunately, ideal conditions are hard to find in the field. Even the shortest of grass or brush can obscure the target when you’re that low to the ground. Still, it’s worth knowing and practicing the prone position, especially if you’re planning to hunt for antelope or mule deer in the flat, open country found out West. It’s also a great position to use when shooting from a hill or cliff above your target.
Starting from a standing position, drop down to one knee then lean forward until you’re flat on your stomach with the left side of your body angling slightly toward the target (if you’re right-handed). Support your firearm with your left elbow on the ground and left hand under the rifle’s forearm. With the other hand, remember the words “butt up-head up,” meaning you should keep the butt of the gun up in your shoulder pocket and your head raised. This will comfortably align your eye with the scope or sights. The “butt up-head up” mantra will also remind you to use your left hand for aiming both left-to-right and up-and-down, rather than raising or lowering the buttstock into an uncomfortable, and ultimately less accurate position.
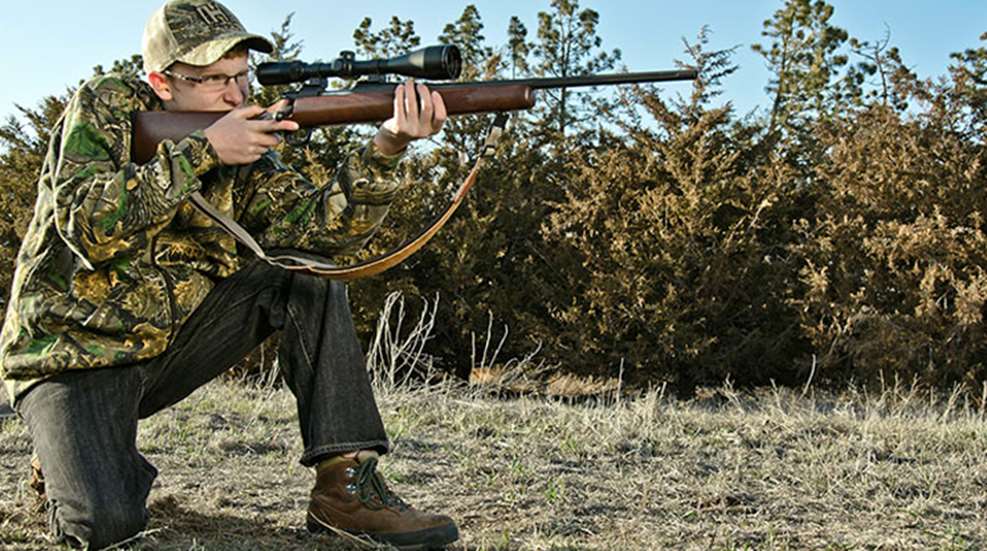
Sitting
My favorite of the four shooting positions is sitting on my rear with legs or ankles crossed. The sitting position allows a clear shooting lane over most grass and brush and, although not as steady as prone, is very accurate when executed correctly. The one downside is that it’s a little slower to get into position, though with some practice, a shooter can go from standing to sitting with the crosshairs on target in just a few seconds.
There are actually a few different ways to shoot while sitting. Many shooters prefer to sit with both feet on the ground and knees up to create a place to rest your arms. The key here is to remember not to place your elbows directly on the knees. Instead, rest the back of your arms in front of your knees to create the most stability and accuracy.
Personally, I’m more accurate when sitting on the ground with my legs crossed and elbows tucked into the pocket created by my bent knees. With practice, I can drop into the position quickly, quartering the left side of my body slight toward the target, and have a stable base to shoot from. At the range, practice both sitting positions to see which suits you best.
Kneeling
When seconds count, shooting from a kneeling position is your best bet. Use it for still-hunting through the woods when quick, safe and steady shots are necessary to fill your tag. It’s also great for spot-and-stalk hunting in brushy country, where even a sitting position puts your line-of-sight to the target below the brush. When a mule deer pops from the brush, then stops to check his backtrail before disappearing over the horizon, a quick shot from the kneeling position often means the difference between meat in the freezer or “tag soup,” so practice it often.
From the standing or walking position, step forward with your off-side leg (left leg if you shoot right-handed; vice-versa for lefties), and place your opposite knee on the ground. For the most stable base, lay that foot on the ground and sit directly on it. If that’s not comfortable, you can also place your toes on the ground and sit on your heel. The back of your left arm should rest just in front of your knee, much as in the sitting position, creating a steady “post” from your hand to the ground. (Never place your elbow directly on your knee, which creates a very unstable connection.) Kneeling also allows you to adjust for elevation by sliding your planted foot forward or backward.
Standing
Although it’s the toughest position to master, shooting off-hand while standing upright is sometimes the only shot you’ve got. It pays to spend a lot of time practicing this at the range, but in the field, limit it to shooting at targets that are closer than 100 yards away. Even then, the off-hand shot should only be used as a last resort and if you must shoot standing, do your best to use some type of rest, whether it’s a monopod, tall shooting sticks or even a nearby tree.
In the tight quarters of dark timber, when a deer or elk appears, quickly shift your body at a 90-degree angle toward the target. Raise the rifle to your shoulder without lowering your head. Support the gun’s fore-end with your off-hand and tuck that elbow into your side, creating a triangle with your arm, body and the rifle as each of the three sides. Every shooter, even Olympians, has a bit of wobble in the off-hand position, but the key is taking the shot as soon as you can do so safely, because the longer you hold that position, the worse your wobble will get.
Take a Rest
Improving your shooting from each of these four positions is as easy as reaching for a steady rest. In any situation you are the weakest link to the most accurate shot possible, and some type of rest will dramatically increase the odds of quickly and cleanly getting off an accurate shot. On the range, this is as easy as placing a sandbag or other commercially available rest under the rifle’s forearm, but what about in the woods?
In the field, getting a steady rest means grabbing, sometimes literally, whatever is handy. When standing, this often means placing the rifle’s forearm in the crook of a tree branch or against the trunk itself. A tree also works great from the sitting or kneeling positions, as does a tall backpack or even two sturdy branches crossed together at the top like a bipod. Even the prone position can be improved by resting your rifle on a pack, rolled-up coat or even by placing your hand between the gun’s forearm and a rock. The point is, shooting from an unsupported position should be an option of last resort only. Even in the woods there is almost always a way to steady yourself for the perfect shot.
Photos by www.tessrouseyphoto.com